Tuesday, October 16, 2012

Mum,are we going to the show?


Every year from the age of about 5 I guess...I would ask my parents( my mum mainly) if we were going to the Royal Melbourne Show. The answer would always be "we'll see", which I hated as I wanted a definite YES!

The show back then for me as a kid was about obtaining a Barbie showbag and a Bertie Beetle showbag of course,a kewpie doll on a stick and stuffing your face with Fairy Floss.
My childhood was revisited when my mum and I went to the show this year together. We couldn't have asked for a more perfect sunny day.

 
Looking at the gorgeous animals, the people walking around with balloons and showbags,big kids and little kids screaming from the "Pirate Ship" ride.. ..I was still excited.
This year however something that really made me excited was going to the Craft and Cookery events. My mum loves sewing and anything that involves a needle so she loved the Crafe Hall.

 I watched the 2012  Fruit Cake being judged, a well groomed lady stood with gloves on, carefully slicing up a fruit cake and chewing slowly while she either nodded approvingly or said into her microphone, " this one was cooked too long".

 
My mum and I had a coffee and we tried the  Award winning fruit cake(pic below) with a fruit cake recipe card (above) and we both looked at each other and said "we can do this"...The award winning fruit cake was yum though.


There was a Food Hall where I tried "Espresso ice cream" it was really yum and Karen Martini was right beside me buying ice cream.
I am not going to lie the Show bag Hall still had me giggling and 'Oohing and aahing' like a kid...
The whole ambience of being able to travel back in time by  being at the show was so much fun.
I did buy showbags which was the  Bertie beetle show bags which  are still the same price $5... and I brought pink, fluffy and every so sweet  Fairy Floss on a stick (below)and then we found this cute little stall that sold cheap cookie cutters so I was in my element there.


Mum brought me a Kewpie doll on a stick as whenever I went as a kid my Dad would get my sisters and I one. Although back in the 80s my kewpie never had glitter on her head.. ...I was very content with my new kewpie Doll.


Being at the show got me thinking of fruit cake and making my own so I will be testing out a few recipes and posting my fav next blog.

I have been getting into Baking bread recently and two items that were a hit at my place were "Garlic and Rosemary Focaccia and Olive bread rolls".  The thing with baking bread is patience you can't rush this...You need to wait for the yeast to prove (activate) and knead the dough and then let it rest and then bake it and you have the most amazing smelling house..... Well a bakery really.

Focaccia is my favourite type of Italian bread.It’s really easy to make I have gone with the traditional Garlic and Rosemary but you can add tomato and basil or whatever topping you desire.


GARLIC AND ROSEMARY FOCACCIA

Ingredients

• 1kg strong white bread flour, plus extra for dusting
 625ml water, at room temperature
 3 x 7g sachets dried yeast
2 tablespoons raw sugar
 sea salt and freshly ground black pepper
olive oil
 1 bulb garlic
a few sprigs of  fresh  rosemary

METHOD 

• Tip your flour  into a large bowl
• Pile it nice and high, then make a well in the middle to hold all the other ingredients
• Pour half the water into the well then tip in 3 sachets of yeast

To make your dough

• Add 2 tablespoons of sugar and 1 tablespoon of sea salt to the well
• Use a fork to gradually bring in the flour from the outside
• Once you get a stodgy, porridge consistency in the well, add the rest of the water and gradually incorporate the flour to make a smooth dough

To knead your dough

• Dust a clean work surface and your hands with flour, then knead the dough, pushing and pulling it for about 5 minutes until it’s silky, springy and elastic
• Make the dough into a flat round shape and pop into a floured bowl
• Cover the bowl with a damp tea towel and leave to prove in a warm place for 1 hour, or until it has doubled in size

To make your bread

• Knock the air out of your bread using your fist then lightly flour your surface and knead it again until smooth
• Grease a baking tin (approximately 25cm by 30cm) well with olive oil and dust it lightly with flour (I use a deep baking tray).
• Roll or stretch the dough out until it’s the right size for the baking tin and put it in the tin

• Break the garlic bulb apart or you can mince it , leaving the skins on, then squash each one with the back of a knife
• Strip the leaves off your sprigs of rosemary
• Drizzle the garlic cloves and rosemary leaves with a little olive oil, season with salt and pepper and mix

• Scatter the garlic and rosemary over the dough then use your fingers to push the flavours in and make little dimples on the surface
• Drizzle the dough with olive oil, cover with a tea towel then place the tray somewhere warm and leave for 1 hour, or until doubled in size
• Preheat your oven to 220ºC

• Poke the bread all over with your fingers again to give it great texture
• Sprinkle with a pinch of salt and pepper
• Bake in the hot oven for 20 to 25 minutes, or until golden with a crunchy surface


I will be tesitng out fruit cake recipes as well as baking Christmas Gingerbread and I am also trying out a  tea inspired recipe I have in my head so until next time get into that kitchen and bake away!!


Monday, September 3, 2012

Recipes to make your hips and you smile....


Who says that eating healthy has to be all about cardboard cereal and boring food ....Not true!!
I am on a super health kick and I thought why not use my cookery knowledge to come up with some yummy dessert and savoury snack recipes.

The recipe below is a take on the delicious cheesecake recipe...(This is would be for a treat day as it does contain cream and cream cheese . So it's perfect for a special day and one glass is filling)

PINEAPPLE NO BAKE CHEESECAKE

INGREDIENTS:
For the Crust
3/4 cup Arnotts Marie biscuit crumbs
...
1 tablespoon icing sugar
2 tablespoons unsalted butter, melted

For the Filling
250 grams package light cream cheese, softened ( leave out at room temperature)
3 tablespoons caster sugar
250 grams fresh pineapple, pureed
1/2 teaspoon pure vanilla extract
250 mls whipped cream

For the Garnish
whipped cream
fresh pineapple chopped

DIRECTIONS:
1. In a medium bowl, stir together the biscuit crumbs, sugar and melted butter. Evenly divide the crumbs between your individual serving dishes and press into the bottoms of the dishes to form a crust layer.

2. In a large bowl, with an electric mixer, beat the cream cheese and sugar on medium-high speed until smooth and creamy, about 3 minutes. Add in pureed pineapple and vanilla and stir - mix to combine, scraping down the sides of the bowl as needed. Using a rubber spatula, fold in the whipped cream until well combined.

3. Evenly pipe or spoon the filling into prepared individual serving dishes. Cover with plastic wrap and refrigerate for at least 3 hours before serving.

4. Garnish with additional whipped cream and fresh chopped pineapple.


The next recipe is for snack time so when you are wanting to lose some weight or basically want to eat healthy. Then having protein as a snack is what you want to be doing. These babies below are so delicious and SO easy to make.

BACON EGG BITES

5 eggs beaten
4 rashers bacon chopped
1/2 cup light milk
salt / pepper to season
Parsley chopped
Parmaesan cheese - grated
Canola spray - for greasing muffin tin

Method:
Heat oven to 180c.
Add eggs to bowl and beat and milk and salt and pepper. Mix well.
Add bacon, cheese and parsley. MIx well.
Spray a muffin tin with canola oil spray and place tablespoons of mixture  in tray.
Bake for 20 minutes or until fluffy and golden brown.


My sister Eloise told me about these cookies she had at work and how easy they were to make not to mention they were gluten free and super healthy ...So here they are!!
Perfect for breakfast with a protein smoothie or for an afternoon sn...
ack.

BANANA OAT COOKIES
3 ripe bananas
2 cups (185g) rolled oats
1 cup (155g) currants pitted and chopped or you can use Dried Apricots or Dates
1/3 cup vegetable oil
1 teaspoon vanilla Extract

Preparation
Prep: 15 minutes | Cook: 20 minutes
1.Preheat oven to 180 degrees C.
2.In a large bowl, mash the bananas. Stir in oats, dates, oil, and vanilla. Mix well, and allow to sit for 15 minutes. Drop by teaspoonfuls onto an ungreased baking tray.
3.Bake for 20 minutes in the preheated oven, or until lightly brown.


Next post will be about Baking bread  and yeasty good stuff and yes it's all healthy everything in moderation I say.
Keep on cooking !!!!


Tuesday, August 14, 2012

Sugar , Spice and all things sweet and YUM !!


For those that don't know yes I am a qualified chef but ever since I can remember I loved baking....Baking  cookies, cakes anything sweet really.

So it wasn't until about 2 months ago I delved into my cookery passion and realised I love cooking anything sweet and this is what I want to do for a long long time to come. Don't get me wrong I love cooking savoury in all it's forms I just seem to gravitate towards baking sweet stuff alot....alot.

Now baking anything sweet doesn't have to be really unhealthy as I have had this brought to my attention. I have made some delicious recipes that taste so good but are good on your waist line. Like my apricot and coconut raw balls (recipe to come) and my delicious Vanilla custard (recipe to come).
For me it's all about measuring the ingredients, going out and buying the equipment and above all cooking it. I just love it.


I made some scary chocolate cupcakes for my nephew Addison's 5th birthday in June. These were a really easy chcocolate cake  with chocolate buttercream and a scary green buttercream. Then the artist in me came out (well not really I just brought teeth lollies and went for it). It was so much fun and the kids and my nephew especially loved them.
These would have to be the perfect cupcake to make with kids as it's fun and they can be as creative as like wish.
I also made chocolate cupcakes for my sister Michelle's 40th Birthday with a rich white buttercream and a pink buttercream. So easy and simple and I decorated them with a dusting of clear glitter and silver cachous.


My beautiful sister Natalie got engaged so I put my hand up to make her cupcake engagement tower. Her colour theme was gold and mauve so I came up with mini chocolate cupcakes with white butter cream and chocolate butter cream. A mauve fondant heart was placed on top of each cupcake sprinkled with mauve edidble glitter.


My sister Natalie and her partner James loved them! Congratulation's again to Nat and JD!! xx


I was out shopping the other day and I stumbled upon this Barbie it has to be mine.
Panackae Making Barkie....


Next blog I will be including recipes for the easiest No bake cheesecake so quick and delicious and a must know recipe for your baking needs.


Until next time keep on cooking !!

Monday, April 23, 2012

Ren meets Burger and some other stuff


I am all about finding out the best foodie haunts and a couple of friends asked me where to get the best pizza...Well I have said it once and I will say it again...My pick would be iCarusi. So you want Pizza? I am talking real Pizza non of that call this number for a free large pizza with cheese in the crust. If so then you have to check out iCarusi located on Holmes street Brunswick.
I've been a couple of times and everytime I tell myself to leave room for the chocolate "I am going to melt in your mouth" pizza. But I am always full, but there is always next time.


Anyway I know the owner / pizzaiola extradonaire Tristan Care (pictured above) and asked him a few questions about his amazing and successful pizza shop iCarusi.

1. What made you enter Hospitality?
Probably growing up working at my dads cafe

2. What is the most talked about pizza at iCarusi ?
Pizza for a friend(fiore di latte, pumpkin, pine nuts, rocket & goats cheese), also the mixed chocolate and strawberry calzoncino .... ( ahhh it's a sign I have to go and order it).

3. What is your favorite pizza topping?
   Good sauce and sopressa (sopressa  is an Italian aged salami, produced with pork, lard, salt, pepper, spices and sometimes garlic).

4. Must haves in the kitchen?
Sharp knives :) (I totally agree).

5. Any advice for people that want to work in the gourmet pizza trade? 
Source out good fresh produce suppliers. And treat your staff well, they are the face of your business.


Make sure you check out iCarusi 46 Holmes Street Brunswick, I am so ordering that chocolate and  strawberry calzon next time.

For those of you that follow me on Facebook https://www.facebook.com/LaughingchefCookeryschool will know that recently I consumed my first burger in 3 years (maybe a little longer).


The reason I stopped was for health reasons and environmental and well I didn't want to eat a cow. However I've always had a soft spot for the burger and thought I'd give myself another go.. (Bearing in mind that the meat is organic and of high quality).
So 2 days ago I ate the best burger ever!!! ...Was it the herb mayonnaise? Or the soft bun? Or maybe the complete beef burger package and the memories of walking to Danny 's burger joint in Fitzroy with my sisters and  cousins. Whatever it was I may have another one. ( for those that are vegetarian don't worry I'll be posting the most delicious and easy Vegi burger below). 

Danny's Burgers is located 358/360 St Georges Road Fitzroy North VIC 3068
(03) 9481 5847 and another amazing burger place that I am yet to try but have been hearing some

 amazing news about is called "Huxtaburger" (picture above) located  on Smith street Collingwood.

" Ren Meets Burger"
500g organic high quality beef mince
1 onion, finely diced
2 tbsp tomato sauce
1 tbsp BBQ sauce
2 carrots, grated
2 eggs
½ cup breadcrumbs
Salt & ground black pepper

Method
1. Mix all ingredients together in a large bowl.

2. Divide mixture into 12 portions and roll into patties.

3. BBQ burgers on a grill on medium heat for 7-8 minutes on both sides and serve on toasted buns with sliced tomato, beetroot and rocket , mayonnaise and pretty much anything your heart desires!!!
"Be good to yourself” Vegi Burger (pictured above)

 Ingredients (serves 4)
•1/2 cup (130g) mayonnaise
•1/4 cup (60ml) lemon juice
•1 clove garlic, crushed
* Celery, finely diced
...
* 1 small radish finely diced
•¼ cup of Parsley, Dill chopped
•Salt and pepper

•1 cup cold mashed potato
•1 onion finely diced
•400g canned brown lentils, rinsed, drained
•400g canned chick pea , rinsed, drained
•3 tbs tomato chutney ( if you can’t find tomato chutney sweet chilli sauce works well).
•1 tbs mild Indian curry paste
•1 egg
•¼ cup of fresh parsley , chopped
•1/2 cup dry breadcrumbs
•1 tbs vegetable oil
•Salt and pepper

Method
1.To make the dressing, place the mayonnaise, lemon juice, garlic celery, radish,and herbs in bowl and mix well. Season with salt and pepper to taste.
2.Place the mashed potato, onion, lentils, tomato chutney, curry paste, parsley, egg and breadcrumbs in a large bowl. Season with salt and pepper. Use your hands to bring the mixture together.
3.Divide the mixture into 4 patties, using additional breadcrumbs to help shape the patties.
4.Heat the oil in a large fry pan over medium heat. Cook the patties for 2-3 minutes each side or until golden and warmed through.
5.Serve on burger bun with mayonnaise dressing and your favorite trimmings…YUM!!


The one thing I love apart from cooking is inspiring people to cook my recipes...I love it. I guess I hope my passion transends to that person when they cook...maybe!
Anyway I posted a delicious recipe of a Vanilla Pomegranate Cake. Pomegranate's are in season. so really worthwhile getting out and using some it is a superb fruit and so verstaile not only in the recipe below but with plain yohurt as a topping and SO delicious in whipped cream with crushed vanilla meringues.


 Desiree Larner who follows me on facebook and who I worked with at Optus made this amazing cake that I posted on my Laughing Chef Cookery School Facebook Page. She also  took some really beautiful photo's.  The reason I love her photo's is you can actually see the passion she has for A. Cooking and B.Photography Thanks Desiree really beautiful pictures.(picture below  Desiree Larner with Husband Ben and beautiful girls Aurelia right and Isabella left).


Vanilla & Pomegranate cake
Ingredients
200g butter (at room temperature)
... 200g caster sugar
3 eggs
zest 1 lemon plus juice of ½
140g self-raising flour
100g plain flour
½ tsp Good Quality vanilla extract

FOR THE SYRUP
juice ½ lemon (use the other ½ of the one for the cake)
2 pomegranates , juice of one, seeds of one (or 100ml pomegranate juice, 110g pack pomegranate seeds)
85g caster sugar
½ tsp vanilla extract

1.Heat oven to 160C/140C fan. Grease and line a 20cm loose-bottomed cake tin.
Beat the butter and sugar with an electric whisk until pale and creamy. Add the eggs one at a time, then add the lemon zest and juice and vanilla extract. Fold in the flours with a metal spoon until well mixed. Transfer to the cake tin, smooth the top, then bake for 50 mins until risen and golden.
2. To make the syrup, mix the lemon juice with the pomegranate juice, caster sugar and vanilla, then heat gently until the sugar dissolves. Increase the heat and reduce slightly until syrupy. Remove from the heat and cool slightly, then tip in the pomegranate seeds.
3. Remove the cake from the oven. Allow to cool for a few minutes before poking holes all over it with a skewer and pouring over the pomegranate syrup. Enjoy warm ...Yum!!!


Don't ask me how she had the time to take these amazing photographs of the Pomergrante cake as well as making the cake. (She has 2 little girls ;Aurelia and Isabella) runs her own business called Unique Effects. Just goes to show you that anything is possible!!!

Check out Desiree's business  ..Unique effects on Facebook you will find these absolutely stunning Brooch Bouquet that are all hand made. (pictured below).


Next time it will be all about what to cook for the kids....As I have 2 nephews and 1 neice I love hearing the stories my sister's tell of meal times . I will also be adding some recipes and favourite dishes from other mum's on successful meal times.


Until next time get in that kitchen and have fun!!


Friday, April 6, 2012

One a penny Two a penny Hot Cross Bun....

Easter has come so quickly …which is great as that means I can bake Hot cross buns and eat the Cadbury mini eggs. YUM!!!!
 Although my sister Eloise stated “you can eat a Hot cross bun whenever”. True, but in all it’s Easter Tradition I make Hot Cross Buns and usually hand them out freshly baked.


My girlfriend Nadia knows how much I love all things "foodie related" so she took a picture at work of these amazing Easter Eggs from France ...Umm Nadia where is mine ? :) But thank you for the picture.


Now if you are not that crazy with fruit or currants etc in your Hot Cross Buns then don’t worry just omit them and add your favourite chocolate chips. Yum!!!
The below recipe is also great for lovers of DAIRY FREE recipes .


HOT CROSS BUN or as my nephew Remy calls them "HOT BOT BUN" (Remy pictured above enjoying a Hot Cross Bun).

Ingredients
•1 1/2 cups (375ml) warm milk (Dairy free use Rice Milk as I find it works better).
•2 tsp (7g/1 sachet) dried yeast
•1/4 cup (55g) caster sugar
•60g butter, melted (Nuttelex dairy free spread)
•1 egg, lightly whisked
•4 1/2 cups (675g) plain flour
•1 tsp salt
•3 tsp mixed spice / cinnamon
•1/4 cup (45g) currants
•1/3 cup (80ml) cold water
•1/2 cup (170g) apricot jam

Method
1.Combine the milk, yeast and 1 tbs of sugar in a small bowl. Set aside in a warm place for 10 minutes or until frothy.
2.Combine the milk mixture, butter and egg in a jug and whisk to combine. Combine 4 cups (600g) of flour, salt, mixed spice and remaining sugar in a bowl. Add the sultanas, currants and mixed peel and stir to combine. Make a well in the centre. Pour in the milk mixture and use a wooden spoon to stir until just combined, then use your hands to bring the dough together.
3.Turn onto a lightly floured surface and knead for 10-15 minutes or until smooth and elastic. Place the dough in a bowl and cover with a damp tea towel and place in a warm place for 1 hour or until dough doubles in size.
4.Preheat oven to 200°C. Grease a baking tray . Punch the dough down with your fist. Turn dough onto a lightly floured surface and knead for 2-3 minutes or until dough is smooth and elastic. Divide dough into 16 even pieces and shape each portion into a ball. Arrange dough portions, side by side, in the prepared pan. Set aside in a warm, draught-free place for 30 minutes or until dough has risen 2cm.
5.Meanwhile, mix the remaining flour and water together in a small bowl until a smooth paste forms. Place in a small plastic bag and snip off the end. Pipe a continuous line down the centre of each row of buns, lengthways and widthways, to form crosses. Bake in preheated oven for 10 minutes. Reduce heat to 180°C and bake for a further 20 minutes or until golden and cooked through (buns are ready when they sound hollow when tapped on the base).
6.Turn onto a wire rack. Place the jam in a small saucepan over high heat. Cook, stirring, for 2 minutes or until jam melts. Strain through a fine sieve. Brush hot jam over the buns. Serve warm with butter, or toasted.


Well Daylight savings has well and truly ended and I am happy that the sun will be up at 6:30am and with these cold chilly mornings come cold chilly nights. But there is a bonus to that as well as there is nothing better on a chilly night than something warm and delicious to eat. In saying this I went around to my good friend Michelle’s house and she was cooking up a storm. (Michelle pictured above).
Now most people hate cooking for me it is mainly due to the fact that I am a chef; but honestly I love it. I love the passion when someone cooks for me and above anything else the story behind the meal.
Michelle made me Stuffed Zucchini's which had rice and meat inside and was delicious. The thing I love about eating home cooking is  I love where the recipe oringates  from and the pleasure it brings to the cook making it. But above all of that I love the taste.
Michelle use white rice and added several herbs tomato paste to a serving of cooking mince meat with onions . Michelle then goes about  stuffing each Zucchini with the filling after she had carefully removed the inside from each.
Each juicy zucchini is plugged up with a tomato so the filling doesn't  leak out  (which I thought was genius) then immersed in a  large pot with water and tomato paste and they are ready when the rice is cooked.

Michelle brought me over a bowl and what I loved was the liquid that the zucchini had been cooking in turned into a thickish sort of soup ...absolutely delicious.  Thank you Michelle it was absolutely delicious!!!.
 (Full recipe to come)


If you follow me on Facebook Laughingchefcookeryschool then you will know I have been wanting Madagascar Vanilla Paste at $36 for a 118ml glass bottle  for a while now.
Well on Thursday I went to pick up my sister Natalie from work and she said "I have a pressie for you"! I replied in a high pitch voice , "What is it?"... It turned out my little Sis follows me on facebook (of course) and knew about my love for the Vanilla paste and went out and brought it for me. I am so excited to use this, for those  that are not aware Madagascar is one of many forms of the Vanilla Bean Family and when cooking with it you experience the true taste of the Vanilla Bean. Thanks Nat cannot wait to make, Biscotti, Ricotta and Lemon cakes and my favourite Italian Fluffy Meringue.

Also thank you to my beautiful Nephew Addison who is 4 years of age who said "Renee I have a surprise for you"! He then produced this Lego Chef below which I am in love. with .. it is the little things in life that make you smile.


My girlfriend Daniela went to Perth for a weddding last weekend and she took some pics of the scenery and one just reminded me of my childhood as I have a love for Ferris Wheels (and Fairy Floss).


Next blog I will be putting up some Hearty dishes to cook which are super easy as well as some really easy bread recipe (do not fear yeast it is your friend), and a cinnamon and Blueberry scroll recipe.
Have a safe and Happy Easter or Buona Pasqua a Tutti.


Sunday, March 25, 2012

When the going gets tough the tough bake a cake.....

When  Christmas and Easter lure their heads I always get emotional thinking about my Nonna(pictured below)mainly due to the fact that she was the one behind all the family get together’s …the Chef!.


Now as Easter is approaching I think of my beautiful Grandmother preparing Easter biscuits, making delicious meals that would hit you right in the face when you entered her home. But above all I remember my “Nonna Palma” always smiling and always being in the kitchen cooking. I didn’t start cooking because of my Nonna as I actually didn’t find out until a couple of years ago that she too was a chef and a lover of all things cooking. But I do definitely keep cooking because of her and whenever I have a “bad” day and question my cookery skills she is always with me guiding me to cook from the heart. So in saying that I wanted to share the below recipe dedicated to my Nonna she would always make Easter Biscuits slightly sweet dough which I couldn’t get enough of as a kid (and I loved the fact that she made every person a biscuit).

Ciaramicola
This bread/ cake is called Ciaramicola and is traditionally baked at Easter. Ciaramicola is a traditional cake from Perugia, Umbria’s capital city. In a past when things were simple, young women made it for their fiancé as a gift for Easter. The cake is highly symbolic: an immaculate meringue hides a red-hot heart( the sponge inside)
Recipe

I make the dough as a cake, not as a sweet bread:
§  450 gr. ( 4 and 1/2 cups) cake flour
§  2 whole eggs
§  2 egg yolks
§  250 gr sugar
§  170 gr butter
§  grated zest of one lemon
§  1 teaspoon vanilla extract
§  3 tablespoon alkermes or dessert wine
§  4 tablespoon milk
16 gr (4 teaspoons) baking powder

Using a food processor, mix first dry ingredients with butter, then add all liquid ingredients. Transfer in a buttered bundt pan and bake in preheated oven at 180° C until set, about 45 minutes. Meanwhile make the meringue as explained below. Remove from the oven, switch off heat, but keep the oven warm as you will need it to dry the meringue. Remove the cake from the cake mold as soon as it is cool enough to handle.

for the meringue topping:
§  110 gr. Caster  sugar
§  2 egg whites at room temperature
§  2 tablespoon lemon juice

To make a classic Italian meringue, combine the ingredients in a metal bowl. Place over a saucepan of gently simmering water and beat with an electric mixer until very thick, about 5-6 minutes. Remove the bowl from heat and beat off the heat until light and fluffy.
Assemble the ciaramicola:
Cover the cake above and around the sides with a thick layer of meringue. Sprinkle with multicolor confetti if you like. Transfer in the warm oven and leave to dry for several hours or until the next day. Enjoy with a glass of sweet wine like Moscato or Vin Santo.

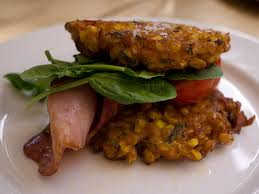
Now with Easter coming up if you are having friends/ family over a great canape to serve are my amazing Corn Fritters. I usually serve them with creme friache(sour cream) and a sprinkling of chopped chives. However I was thinking before I drift off to sleep the other night as I often do and I came up with a "low carb" burger and I have named it after my boxing buddy Daniela as well we have had our fair share of not consuming carbs. But feel free to add a bread bun I just totally love the fact that the corn fritter takes the place ...literally!


"Dani's Corn Fritter Burger ..Low carb"
 
 1 cup Self-Raising Flour
1/2 cup Milk
2 eggs
420g can corn kernels, drained
 1/4 cup finely chopped chives
1 teaspoon of Tabasco sauce
Salt & Pepper to taste
olive oil cooking spray

Avocado, lettuce, tomato, red onion etc for assembling burger

  1. Sift flour into a large bowl. Season with salt and pepper. Stir until well combined. Make a well in the centre.
  2. Whisk buttermilk and eggs in a jug. Add to flour mixture with corn kernels, creamed corn and chives. Using a large metal spoon, gently fold ingredients together until combined (don't overmix).
  3. Preheat oven to 150°C. Heat a non-stick frying pan over medium heat. When hot, remove from heat. Spray with oil. Return frying pan to heat. Add heaped tablespoonfuls of mixture, 3 at a time. Use a knife to spread to 8cm (diameter) rounds.
  4. Cook for 2 minutes or until bubbles appear on surface. Turn. Cook for a further 2 minutes or until fritters are firm to the touch. Keep warm in oven while cooking remaining fritters. Place onto plates. Top with chives.
  5. Now for the burger slice up an avocado and place on top of a corn fritter . Slice tomato, red onion, grill some bacon, toss in some lettuce. Top with a 2nd corn fritter. Yummm your very own Corn fritter burger.


My sister Eloise got engaged last week so a HUGE congratulation's to Eloise and Daniel !!!
I am already thinking of what I can wear and really what I can make for their bonbonniere :)


Easter is 2 weeks away so I am busy preparing ; I will be making freshly made Hot Cross Buns so stay tuned for super easy recipe. Until I write again keep on cooking and loving life!!!